Categories
Posts in this category
- Current State of Exceptions in Rakudo and Perl 6
- Meet DBIish, a Perl 6 Database Interface
- doc.perl6.org and p6doc
- Exceptions Grant Report for May 2012
- Exceptions Grant Report -- Final update
- Perl 6 Hackathon in Oslo: Be Prepared!
- Localization for Exception Messages
- News in the Rakudo 2012.05 release
- News in the Rakudo 2012.06 release
- Perl 6 Hackathon in Oslo: Report From The First Day
- Perl 6 Hackathon in Oslo: Report From The Second Day
- Quo Vadis Perl?
- Rakudo Hack: Dynamic Export Lists
- SQLite support for DBIish
- Stop The Rewrites!
- Upcoming Perl 6 Hackathon in Oslo, Norway
- A small regex optimization for NQP and Rakudo
- Pattern Matching and Unpacking
- Rakudo's Abstract Syntax Tree
- The REPL trick
- First day at YAPC::Europe 2013 in Kiev
- YAPC Europe 2013 Day 2
- YAPC Europe 2013 Day 3
- A new Perl 6 community server - call for funding
- New Perl 6 community server now live, accepting signups
- A new Perl 6 community server - update
- All Perl 6 modules in a box
- doc.perl6.org: some stats, future directions
- Profiling Perl 6 code on IRC
- Why is it hard to write a compiler for Perl 6?
- Writing docs helps you take the user's perspective
- Perl 6 Advent Calendar 2016 -- Call for Authors
- Perl 6 By Example: Running Rakudo
- Perl 6 By Example: Formatting a Sudoku Puzzle
- Perl 6 By Example: Testing the Say Function
- Perl 6 By Example: Testing the Timestamp Converter
- Perl 6 By Example: Datetime Conversion for the Command Line
- What is Perl 6?
- Perl 6 By Example, Another Perl 6 Book
- Perl 6 By Example: Silent Cron, a Cron Wrapper
- Perl 6 By Example: Testing Silent Cron
- Perl 6 By Example: Stateful Silent Cron
- Perl 6 By Example: Perl 6 Review
- Perl 6 By Example: Parsing INI files
- Perl 6 By Example: Improved INI Parsing with Grammars
- Perl 6 By Example: Generating Good Parse Errors from a Parser
- Perl 6 By Example: A File and Directory Usage Graph
- Perl 6 By Example: Functional Refactorings for Directory Visualization Code
- Perl 6 By Example: A Unicode Search Tool
- What's a Variable, Exactly?
- Perl 6 By Example: Plotting using Matplotlib and Inline::Python
- Perl 6 By Example: Stacked Plots with Matplotlib
- Perl 6 By Example: Idiomatic Use of Inline::Python
- Perl 6 By Example: Now "Perl 6 Fundamentals"
- Perl 6 Books Landscape in June 2017
- Living on the (b)leading edge
- The Loss of Name and Orientation
- Perl 6 Fundamentals Now Available for Purchase
- My Ten Years of Perl 6
- Perl 6 Coding Contest 2019: Seeking Task Makers
- A shiny perl6.org site
- Creating an entry point for newcomers
- An offer for software developers: free IRC logging
- Sprixel, a 6 compiler powered by JavaScript
- Announcing try.rakudo.org, an interactive Perl 6 shell in your browser
- Another perl6.org iteration
- Blackjack and Perl 6
- Why I commit Crud to the Perl 6 Test Suite
- This Week's Contribution to Perl 6 Week 5: Implement Str.trans
- This Week's Contribution to Perl 6
- This Week's Contribution to Perl 6 Week 8: Implement $*ARGFILES for Rakudo
- This Week's Contribution to Perl 6 Week 6: Improve Book markup
- This Week's Contribution to Perl 6 Week 2: Fix up a test
- This Week's Contribution to Perl 6 Week 9: Implement Hash.pick for Rakudo
- This Week's Contribution to Perl 6 Week 11: Improve an error message for Hyper Operators
- This Week's Contribution to Perl 6 - Lottery Intermission
- This Week's Contribution to Perl 6 Week 3: Write supporting code for the MAIN sub
- This Week's Contribution to Perl 6 Week 1: A website for proto
- This Week's Contribution to Perl 6 Week 4: Implement :samecase for .subst
- This Week's Contribution to Perl 6 Week 10: Implement samespace for Rakudo
- This Week's Contribution to Perl 6 Week 7: Implement try.rakudo.org
- What is the "Cool" class in Perl 6?
- Report from the Perl 6 Hackathon in Copenhagen
- Custom operators in Rakudo
- A Perl 6 Date Module
- Defined Behaviour with Undefined Values
- Dissecting the "Starry obfu"
- The case for distributed version control systems
- Perl 6: Failing Softly with Unthrown Exceptions
- Perl 6 Compiler Feature Matrix
- The first Perl 6 module on CPAN
- A Foray into Perl 5 land
- Gabor: Keep going
- First Grant Report: Structured Error Messages
- Second Grant Report: Structured Error Messages
- Third Grant Report: Structured Error Messages
- Fourth Grant Report: Structured Error Messages
- Google Summer of Code Mentor Recap
- How core is core?
- How fast is Rakudo's "nom" branch?
- Building a Huffman Tree With Rakudo
- Immutable Sigils and Context
- Is Perl 6 really Perl?
- Mini-Challenge: Write Your Prisoner's Dilemma Strategy
- List.classify
- Longest Palindrome by Regex
- Perl 6: Lost in Wonderland
- Lots of momentum in the Perl 6 community
- Monetize Perl 6?
- Musings on Rakudo's spectest chart
- My first executable from Perl 6
- My first YAPC - YAPC::EU 2010 in Pisa
- Trying to implement new operators - failed
- Programming Languages Are Not Zero Sum
- Perl 6 notes from February 2011
- Notes from the YAPC::EU 2010 Rakudo hackathon
- Let's build an object
- Perl 6 is optimized for fun
- How to get a parse tree for a Perl 6 Program
- Pascal's Triangle in Perl 6
- Perl 6 in 2009
- Perl 6 in 2010
- Perl 6 in 2011 - A Retrospection
- Perl 6 ticket life cycle
- The Perl Survey and Perl 6
- The Perl 6 Advent Calendar
- Perl 6 Questions on Perlmonks
- Physical modeling with Math::Model and Perl 6
- How to Plot a Segment of a Circle with SVG
- Results from the Prisoner's Dilemma Challenge
- Protected Attributes Make No Sense
- Publicity for Perl 6
- PVC - Perl 6 Vocabulary Coach
- Fixing Rakudo Memory Leaks
- Rakudo architectural overview
- Rakudo Rocks
- Rakudo "star" announced
- My personal "I want a PONIE" wish list for Rakudo Star
- Rakudo's rough edges
- Rats and other pets
- The Real World Strikes Back - or why you shouldn't forbid stuff just because you think it's wrong
- Releasing Rakudo made easy
- Set Phasers to Stun!
- Starry Perl 6 obfu
- Recent Perl 6 Developments August 2008
- The State of Regex Modifiers in Rakudo
- Strings and Buffers
- Subroutines vs. Methods - Differences and Commonalities
- A SVG plotting adventure
- A Syntax Highlighter for Perl 6
- Test Suite Reorganization: How to move tests
- The Happiness of Design Convergence
- Thoughts on masak's Perl 6 Coding Contest
- The Three-Fold Function of the Smart Match Operator
- Perl 6 Tidings from September and October 2008
- Perl 6 Tidings for November 2008
- Perl 6 Tidings from December 2008
- Perl 6 Tidings from January 2009
- Perl 6 Tidings from February 2009
- Perl 6 Tidings from March 2009
- Perl 6 Tidings from April 2009
- Perl 6 Tidings from May 2009
- Perl 6 Tidings from May 2009 (second iteration)
- Perl 6 Tidings from June 2009
- Perl 6 Tidings from August 2009
- Perl 6 Tidings from October 2009
- Timeline for a syntax change in Perl 6
- Visualizing match trees
- Want to write shiny SVG graphics with Perl 6? Port Scruffy!
- We write a Perl 6 book for you
- When we reach 100% we did something wrong
- Where Rakudo Lives Now
- Why Rakudo needs NQP
- Why was the Perl 6 Advent Calendar such a Success?
- What you can write in Perl 6 today
- Why you don't need the Y combinator in Perl 6
- You are good enough!
Sun, 11 Nov 2018
Perl 6 Coding Contest 2019: Seeking Task Makers
Permanent link
I want to revive Carl Mäsak's Coding Contest as a crowd-sourced contest.
The contest will be in four phases:
- development of tasks
- public contest, where you can solve the tasks
- public commenting on solutions
- grading and awarding of prizes
For the first phase, development of tasks, I am looking for volunteers who come up with coding tasks collaboratively. Sadly, these volunteers, including myself, will be excluded from participating in the second phase.
I am looking for tasks that ...
- are well-worded
- have a (private) implementation that shows it is solvable, preferably in under 500 lines of code
- have a few public tests to help the participants, and a more tests tests that help the graders and commenters later on
This is non-trivial, so I'd like to have others to discuss things with, and to come up with some more tasks.
If you want to help with task creation, please send an email to moritz.lenz@gmail.com, stating your intentions to help, and your freenode IRC handle (optional).
There are other ways to help too:
- You can pledge a prize (some ideas: Comma IDE subscription, books, Camelia plushies, Amazon vouchers)
- You can help design a small website for the contest
- You can help iron out the exact rules for the contest
- ... or any other way that I didn't think of :-)
In these cases you can use the same email address to contact me,
or use IRC (moritz on freenode) or twitter.
Wed, 09 Aug 2017
My Ten Years of Perl 6
Permanent link
Time for some old man's reminiscence. Or so it feels when I realize that I've spent more than 10 years involved with the Perl 6 community.
How I Joined the Perl 6 Community
It was February 2007.
I was bored. I had lots of free time (crazy to imagine that now...), and I spent some of that answering (Perl 5) questions on perlmonks. There was a category of questions where I routinely had no good answers, and those were related to threads. So I decided to play with threads, and got frustrated pretty quickly.
And then I remember that a friend in school had told me (about four years earlier) that there was this Perl 6 project that wanted to do concurrency really well, and even automatically parallelize some stuff. And this was some time ago, maybe they had gotten anywhere?
So I searched the Internet, and found out about Pugs, a Perl 6 compiler written in Haskell. And I wanted to learn more, but some of the links to the presentations were dead. I joined the #perl6 IRC channel to report the broken link.
And within three minutes I got a "thank you" for the report, the broken links were gone, and I had an invitation for a commit bit to the underlying SVN repo.
I stayed.
The Early Days
Those were they wild young days of Perl 6 and Pugs. Audrey Tang was pushing Pugs (and Haskell) very hard, and often implemented a feature within 20 minutes after somebody mentioned it. Things were unstable, broken often, and usually fixed quickly. No idea was too crazy to be considered or even implemented.
We had bots that evaluated Perl 6 and Haskell code, and gave the result directly on IRC. There were lots of cool (and sometimes somewhat frightening) automations, for example for inviting others to the SVN repo, to the shared hosting system (called feather), for searching SVN logs and so on. Since git was still an obscure and very unusable, people tried to use SVK, an attempt to implement a decentralized version control system on top of of the SVN protocol.
Despite some half-hearted attempts, I didn't really make inroads into compiler developments. Having worked with neither Haskell nor compilers before proved to be a pretty steep step. Instead I focused on some early modules, documentation, tests, and asking and answering questions. When the IRC logger went offline for a while, I wrote my own, which is still in use today.
I felt at home in that IRC channel and the community. When the community asked for mentors for the Google Summer of Code project, I stepped up. The project was a revamp of the Perl 6 test suite, and to prepare for mentoring task, I decided to dive deeper. That made me the maintainer of the test suite.
Pet Projects
I can't recount a full history of Perl 6 projects during that time range, but I want to reflect on some projects that I considered my pet projects, at least for some time.
- In early 2008 I started to contribute some patches to perl6.org. Over time I became frustrated with the outdated content on many Perl 6 websites, so I created perl6-projects.org, which only contained links to up-to-date resources. Over time, people with an actual sense of design contribute a nice layout. Later we switched perl6.org over to the content from perl6-projects.org. Its structure today is still mostly that of a link collection.
- In September 2008 I started with the Perl 5 to 6 blog series, which was the de facto resource for learning Perl 6 for some years.
- In 2009 I wrote JSON::Tiny, the first pure-Perl 6 JSON parser. I mostly did it to become familiar with grammars, and because the book "Real World Haskell" also developed a JSON module.
- May 2010 kicked off a program to make contributing to Perl 6 more accessible.
- September 2010: the Pugs SVN repository became unmaintainable. It had accumulated the official Perl 6 test suite, some documentation, modules, at least one IRC bot and a proverbial metric ton of other stuff. In coordination with #perl6, I split it up into a collection of git repositories and put them on GitHub. A decision we haven't regretted yet.
- In 2012 and 2016 I was part of the organization team of the German Perl Workshop in Erlangen and Nürnberg, which both featured several Perl 6 talks.
- 2012 saw the birth of the documentation project. Initially I was nearly the sole contributor, and I'm very happy that, over time, others have taken over.
- Between 2014 and 2015, our community server "feather" EOLed, so the Perl 6 community funded a new server, which my employer, noris network AG kindly hosts for free in their data center in Nürnberg, Germany.
- In 2016 I started writing Perl 6 by Example, which Apress later adopted and published as Perl 6 Fundamentals.
- Currently I'm working on a treatise on Perl 6 Regexes and Grammars, which Apress will also publish.
It is not quite clear from this (very selected) timeline, but my Perl 6 related activity dropped around 2009 or 2010. This is when I started to work full time, moved in with my girlfriend (now wife), and started to plan a family.
Relationships
The technologies and ideas in Perl 6 are fascinating, but that's not what kept me. I came for the technology, but stayed for the community.
There were and are many great people in the Perl 6 community, some of whom I am happy to call my friends. Whenever I get the chance to attend a Perl conference, workshop or hackathon, I find a group of Perl 6 hackers to hang out and discuss with, and generally have a good time.
Four events stand out in my memory. In 2010 I was invited to the Open Source Days in Copenhagen. I missed most of the conference, but spent a day or two with (if memory serve right) Carl Mäsak, Patrick Michaud, Jonathan Worthington and Arne Skjærholt. We spent some fun time trying to wrap our minds around macros, the intricacies of human and computer language, and Japanese food. (Ok, the last one was easy). Later the same year, I attended my first YAPC::EU in Pisa, and met most of the same crowd again -- this time joined by Larry Wall, and over three or four days. I still fondly remember the Perl 6 hallway track from that conference. And 2012 I flew to Oslo for a Perl 6 hackathon, with a close-knit, fabulous group of Perl 6 hackers. Finally, the Perl Reunification Summit in the beautiful town of Perl in Germany, which brought together Perl 5 and Perl 6 hackers in a very relaxed atmosphere.
For three of these four events, different private sponsors from the Perl and Perl 6 community covered travel and/or hotel costs, with their only motivation being meeting folks they liked, and seeing the community and technology flourish.
The Now
The Perl 6 community has evolved a lot over the last ten years, but it is still a very friendly and welcoming place. There are lots of "new" folks (where "new" is everybody who joined after me, of course :D), and a surprising number of the old guard still hang around, some more involved, some less, all of them still very friendly and supportive
The Future
I anticipate that my family and other projects will continue to occupy much of my time, and it is unlikely that I'll be writing another Perl 6 book (after the one about regexes) any time soon. But the Perl 6 community has become a second home for me, and I don't want to miss it.
In the future, I see myself supporting the Perl 6 community through infrastructure (community servers, IRC logs, running IRC bots etc.), answering questions, writing a blog article here and there, but mostly empowering the "new" guard to do whatever they deem best.
Sat, 22 Jul 2017
Perl 6 Fundamentals Now Available for Purchase
Permanent link
After about nine months of work, my book Perl 6 Fundamentals is now available for purchase on apress.com and springer.com.
The ebook can be purchased right now, and comes in the epub and PDF formats (with watermarks, but DRM free). The print form can be pre-ordered from Amazon, and will become ready for shipping in about a week or two.
I will make a copy of the ebook available for free for everybody who purchased an earlier version, "Perl 6 by Example", from LeanPub.
The book is aimed at people familiar with the basics of programming; prior
Perl 5 or Perl 6 knowledge is not required. It features a practical example in most chapters (no mammal hierarchies or class Rectangle inheriting from class Shape), ranging from simple input/output and text formatting to plotting with python's matplotlib libraries. Other examples include date and time conversion, a Unicode search tool and a directory size visualization.
I use these examples to explain subset of Perl 6, with many pointers to more
documentation where relevant. Perl 6 topics include the basic lexicographic
structure, testing, input and output, multi dispatch, object orientation, regexes and grammars, usage of modules, functional programming and interaction
with python libraries through Inline::Python.
Let me finish with Larry Wall's description of this book, quoted from his foreword:
It's not just a reference, since you can always find such materials online. Nor is it just a cookbook. I like to think of it as an extended invitation, from a well-liked and well-informed member of our circle, to people like you who might want to join in on the fun. Because joy is what's fundamental to Perl. The essence of Perl is an invitation to love, and to be loved by, the Perl community. It's an invitation to be a participant of the gift economy, on both the receiving and the giving end.
Tue, 11 Jul 2017
The Loss of Name and Orientation
Permanent link
The Perl 6 naming debate has started again. And I guess with good reason. Teaching people that Perl 6 is a Perl, but not the Perl requires too much effort. Two years ago, I didn't believe. Now you're reading a tired man's words.
I'm glad that this time, we're not discussing giving up the "Perl" brand, which still has very positive connotations in my mind, and in many other minds as well.
And yet, I can't bring myself to like "Rakudo Perl 6" as a name. There are two vary shallow reasons for that: Going from two syllables, "Perl six", to five of them, seems a step in the wrong direction. And two, I remember the days when the name was pretty young, and people would misspell it all the time. That seems to have abated, though I don't know why.
But there's also a deeper reason, probably sentimental old man's reason. I remember the days when Pugs was actively developed, and formed the center of a vibrant community. When kp6 and SMOP and all those weird projects were around. And then, just when it looked like there was only a single compiler was around, Stefan O'Rear conjured up niecza, almost single-handedly, and out of thin air. Within months, it was a viable Perl 6 compiler, that people on #perl6 readily recommended.
All of this was born out of the vision that Perl 6 was a language with no single, preferred compiler. Changing the language name to include the compiler name means abandoning this vision. How can we claim to welcome alternative implementations when the commitment to one compiler is right in the language name?
However I can't weigh this loss of vision against a potential gain in popularity. I can't decide if it's my long-term commitment to the name "Perl 6" that makes me resent the new name, or valid objections. The lack of vision mirrors my own state of mind pretty well.
I don't know where this leaves us. I guess I must apologize for wasting your time by publishing this incoherent mess.
Sun, 25 Jun 2017
Living on the (b)leading edge
Permanent link
Perl 6 is innovative in many ways, and sometimes we don't fully appreciate all the implications, for good or for bad.
There's one I stumbled upon recently: The use of fancy Unicode symbols for built-in stuff. In this case: the `.gist` output of Match objects. For example
my token word { \w+ }
say 'abc=def' ~~ /<word> '=' <word>/;
produces this output:
「abc=def」
 word => 「abc」
 word => 「def」
And that's where the problems start. In my current quest to write a book on Perl 6 regexes, I noticed that the PDF that LeanPub generates from my Markdown sources don't correctly display those pesky 「」 characters, which are
$ uni -c 「」
「 - U+0FF62 - HALFWIDTH LEFT CORNER BRACKET
」 - U+0FF63 - HALFWIDTH RIGHT CORNER BRACKET
When I copied the text from the PDF and pasted into my editor, they showed up correctly, which indicates that the characters are likely missing from the monospace font.
The toolchain allows control over the font used for displaying code, so I tried all the monospace fonts that were available. I tried them in alphabetical order. Among the earlier fonts I tried was Deja Vu Sans Mono, which I use in my terminal, and which hasn't let me down yet. No dice. I arrived at Noto, a font designed to cover all Unicode codepoints. And it didn't work either. So it turns out these two characters are part of some Noto Sans variants, but not of the monospace font.
My terminal, and even some font viewers, use some kind of fallback where they use glyphs from other fonts to render missing characters. The book generation toolchain does not.
The Google Group for Leanpub was somewhat helpful: if I could recommend an Open Source mono space font that fit my needs, they'd likely include it in their toolchain.
So I searched and searched, learning more about fonts than I wanted to know. My circle of geek friends came up with several suggestions, one of them being Iosevka, which actually contains those characters. So now I wait for others to step up, either for LeanPub to include that font, or for the Noto maintainers to create a monospace variant of those characters (and then LeanPub updating their version of the font).
And all of that because Perl 6 was being innovative, and used two otherwise little-used characters as delimiters, in an attempt to avoid collisions between delimiters and content.
(In the mean time I've replaced the two offending characters with ones that look similar. It means the example output is technically incorrect, but at least it's readable).
Thu, 08 Jun 2017
Perl 6 Books Landscape in June 2017
Permanent link
There are lots of news around Perl 6 books to share these days. If you follow the community very closely, you might be aware of most of it. If not, read on :-).
Think Perl 6 is now available for purchase, and also for download as a free ebook. Heck, it's even Open Source, with the LaTeX sources on GitHub!
Perl 6 at a Glance, previously only available in print form, is now available as an ebook. Save paper and shipping costs!
My own book, Perl 6 Fundamentals, is now in the "production" phase: copyediting, indexing, layout. And just before the manuscript submission deadline, Larry Wall has contributed a foreword. How awesome is that?
I've revamped perl6book.com to provide a short overview of the current and future Perl 6 books. As a small gimmick, it contains a flow chart explaining which book to chose. And I even got input from two other Perl 6 book authors (Laurent Rosenfeld of "Think Perl 6", Andrew Shitov of "Perl 6 at a Glance", "Migrating to Perl 6".
From a pull request to perl6book.com, it looks like Andrew Shitov is working on two more Perl 6 books. Keep 'em coming!
Last but not least, Gabor Szabo has started a crowd funding campaign for a Perl 6 book on web app development. There are still a few day left, so you can help it succeed!
And as always, if you want to keep informed about Perl 6 books, you can sign up at perl6book.com for my Perl 6 books mailing list (low volume, typically less than one email per month).
Mon, 01 May 2017
Perl 6 By Example: Now "Perl 6 Fundamentals"
Permanent link
This blog post is part of my ongoing project to write a book about Perl 6.
If you're interested, either in this book project or any other Perl 6 book news, please sign up for the mailing list at the bottom of the article, or here. It will be low volume (less than an email per month, on average).
After some silence during the past few weeks, I can finally share some exciting news about the book project. Apress has agreed to publish the book, both as print and electronic book.
The title is Perl 6 Fundamentals, with A Primer with Examples, Projects, and Case Studies as subtitle. The editorial process is happening right now. I've received some great feedback on my initial manuscript, so there's a lot to do for me.
Stay tuned for more updates!
Sun, 02 Apr 2017
Perl 6 By Example: Idiomatic Use of Inline::Python
Permanent link
This blog post is part of my ongoing project to write a book about Perl 6.
If you're interested, either in this book project or any other Perl 6 book news, please sign up for the mailing list at the bottom of the article, or here. It will be low volume (less than an email per month, on average).
In the two previous installments, we've seen Python libraries being used in Perl 6 code through the Inline::Python module. Here we will explore some options to make the Perl 6 code more idiomatic and closer to the documentation of the Python modules.
Types of Python APIs
Python is an object-oriented language, so many APIs involve method
calls, which Inline::Python helpfully automatically translates for us.
But the objects must come from somewhere and typically this is by calling a function that returns an object, or by instantiating a class. In Python, those two are really the same under the hood, since instantiating a class is the same as calling the class as if it were a function.
An example of this (in Python) would be
from matplotlib.pyplot import subplots
result = subplots()
But the matplotlib documentation tends to use another, equivalent syntax:
import matplotlib.pyplot as plt
result = plt.subplots()
This uses the subplots symbol (class or function) as a method on the
module matplotlib.pyplot, which the import statement aliases to plt.
This is a more object-oriented syntax for the same API.
Mapping the Function API
The previous code examples used this Perl 6 code to call the subplots
symbol:
my $py = Inline::Python.new;
$py.run('import matplotlib.pyplot');
sub plot(Str $name, |c) {
    $py.call('matplotlib.pyplot', $name, |c);
}

my ($figure, $subplots) = plot('subplots');
If we want to call subplots() instead of plot('subplots'), and
bar(args) instead of `plot('bar', args), we can use a function to
generate wrapper functions:
my $py = Inline::Python.new;

sub gen(Str $namespace, *@names) {
    $py.run("import $namespace");

    return @names.map: -> $name {
        sub (|args) {
            $py.call($namespace, $name, |args);
        }
    }
}

my (&subplots, &bar, &legend, &title, &show)
    = gen('matplotlib.pyplot', <subplots bar legend title show>);

my ($figure, $subplots) = subplots();

# more code here

legend($@plots, $@top-authors);
title('Contributions per day');
show();
This makes the functions' usage quite nice, but comes at the cost of duplicating their names. One can view this as a feature, because it allows the creation of different aliases, or as a source for bugs when the order is messed up, or a name misspelled.
How could we avoid the duplication should we choose to create wrapper functions?
This is where Perl 6's flexibility and introspection abilities pay off. There are two key components that allow a nicer solution: the fact that declarations are expressions and that you can introspect variables for their names.
The first part means you can write mysub my ($a, $b), which
declares the variables $a and $b, and calls a function with those
variables as arguments. The second part means that $a.VAR.name returns
a string '$a', the name of the variable.
Let's combine this to create a wrapper that initializes subroutines for us:
sub pysub(Str $namespace, |args) {
    $py.run("import $namespace");

    for args[0] <-> $sub {
        my $name = $sub.VAR.name.substr(1);
        $sub = sub (|args) {
            $py.call($namespace, $name, |args);
        }
    }
}

pysub 'matplotlib.pyplot',
    my (&subplots, &bar, &legend, &title, &show);
This avoids duplicating the name, but forces us to use some lower-level
Perl 6 features in sub pysub. Using ordinary variables means that accessing their
.VAR.name results in the name of the variable, not the name of the
variable that's used on the caller side. So we can't use slurpy
arguments as in
sub pysub(Str $namespace, *@subs)
Instead we must use
|args to obtain the rest of the arguments in a
Capture. This doesn't
flatten the list of variables passed to the function, so when we iterate
over them, we must do so by accessing args[0]. By default, loop
variables are read-only, which we can avoid by using <-> instead of
-> to introduce the signature. Fortunately, that also preserves the
name of the caller side variable.
An Object-Oriented Interface
Instead of exposing the functions, we can also create types that emulate
the method calls on Python modules. For that we can implement a class with a
method FALLBACK, which Perl 6 calls for us when calling a method that is not
implemented in the class:
class PyPlot is Mu {
    has $.py;
    submethod TWEAK {
        $!py.run('import matplotlib.pyplot');
    }
    method FALLBACK($name, |args) {
        $!py.call('matplotlib.pyplot', $name, |args);
    }
}

my $pyplot = PyPlot.new(:$py);
my ($figure, $subplots) = $pyplot.subplots;
# plotting code goes here
$pyplot.legend($@plots, $@top-authors);

$pyplot.title('Contributions per day');
$pyplot.show;
Class PyPlot inherits directly from Mu, the root of the Perl 6 type
hierarchy, instead of Any, the default parent class (which in turn inherits
from Mu). Any introduces a large number of methods that Perl 6 objects
get by default and since FALLBACK is only invoked when a method is not
present, this is something to avoid.
The method TWEAK is another method that
Perl 6 calls automatically for us, after the object has been fully
instantiated. All-caps method names are reserved for such special purposes.
It is marked as a submethod, which means it is not inherited into subclasses.
Since TWEAK is called at the level of each class, if it were a regular
method, a subclass would call it twice implicitly. Note that TWEAK is only
supported in Rakudo version 2016.11 and later.
There's nothing specific to the Python package matplotlib.pyplot in class
PyPlot, except the namespace name. We could easily generalize it to any
namespace:
class PythonModule is Mu {
    has $.py;
    has $.namespace;
    submethod TWEAK {
        $!py.run("import $!namespace");
    }
    method FALLBACK($name, |args) {
        $!py.call($!namespace, $name, |args);
    }
}

my $pyplot = PythonModule.new(:$py, :namespace<matplotlib.pyplot>);
This is one Perl 6 type that can represent any Python module. If instead we want a separate Perl 6 type for each Python module, we could use roles, which are optionally parameterized:
role PythonModule[Str $namespace] is Mu {
    has $.py;
    submethod TWEAK {
        $!py.run("import $namespace");
    }
    method FALLBACK($name, |args) {
        $!py.call($namespace, $name, |args);
    }
}

my $pyplot = PythonModule['matplotlib.pyplot'].new(:$py);
Using this approach, we can create type constraints for Python modules in Perl 6 space:
sub plot-histogram(PythonModule['matplotlib.pyplot'], @data) {
    # implementation here
}
Passing in any other wrapped Python module than matplotlib.pyplot results
in a type error.
Summary
Perl 6 offers enough flexibility to create function and method call APIs around Python modules. With a bit of meta programming, we can emulate the typical Python APIs close enough that translating from the Python documentation to Perl 6 code becomes easy.
Sun, 26 Mar 2017
Perl 6 By Example: Stacked Plots with Matplotlib
Permanent link
This blog post is part of my ongoing project to write a book about Perl 6.
If you're interested, either in this book project or any other Perl 6 book news, please sign up for the mailing list at the bottom of the article, or here. It will be low volume (less than an email per month, on average).
In a previous episode, we've explored plotting git statistics in Perl 6 using matplotlib.
Since I wasn't quite happy with the result, I want to explore using stacked plots for presenting the same information. In a regular plot, the y coordiante of each plotted value is proportional to its value. In a stacked plot, it is the distance to the previous value that is proportional to its value. This is nice for values that add up to a total that is also interesting.
Matplotlib offers a method called
stackplot
for that. Contrary to multiple plot calls on subplot object, it
requires a shared x axis for all data series. So we must construct
one array for each author of git commits, where dates with no value come
out as zero.
As a reminder, this is what the logic for extracting the stats looked like in the first place:
my $proc = run :out, <git log --date=short --pretty=format:%ad!%an>;
my (%total, %by-author, %dates);
for $proc.out.lines -> $line {
    my ( $date, $author ) = $line.split: '!', 2;
    %total{$author}++;
    %by-author{$author}{$date}++;
    %dates{$date}++;
}
my @top-authors = %total.sort(-*.value).head(5)>>.key;
And some infrastructure for plotting with matplotlib:
my $py = Inline::Python.new;
$py.run('import datetime');
$py.run('import matplotlib.pyplot');
sub plot(Str $name, |c) {
    $py.call('matplotlib.pyplot', $name, |c);
}
sub pydate(Str $d) {
    $py.call('datetime', 'date', $d.split('-').map(*.Int));
}

my ($figure, $subplots) = plot('subplots');
$figure.autofmt_xdate();
So now we have to construct an array of arrays, where each inner array has the values for one author:
my @dates = %dates.keys.sort;
my @stack = $[] xx @top-authors;

for @dates -> $d {
    for @top-authors.kv -> $idx, $author {
        @stack[$idx].push: %by-author{$author}{$d} // 0;
    }
}
Now plotting becomes a simple matter of a method call, followed by the usual commands adding a title and showing the plot:
$subplots.stackplot($[@dates.map(&pydate)], @stack);
plot('title', 'Contributions per day');
plot('show');
The result (again run on the zef source repository) is this:
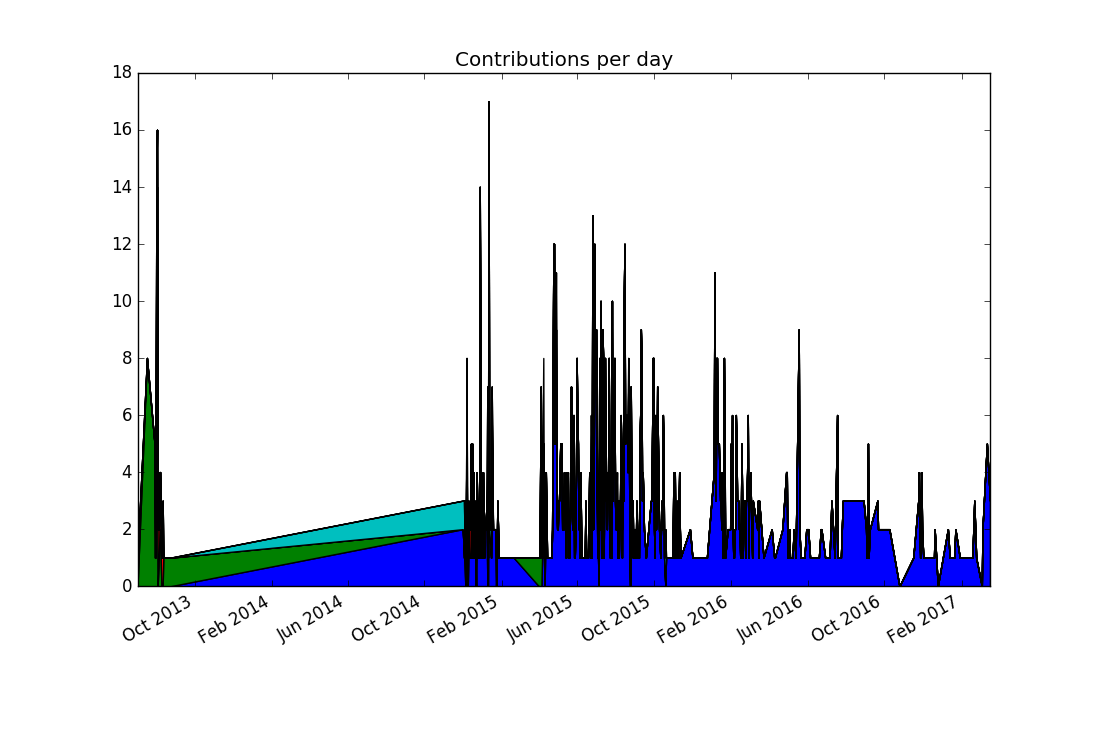
Comparing this to the previous visualization reveals a discrepancy: There were no commits in 2014, and yet the stacked plot makes it appear this way. In fact, the previous plots would have shown the same "alternative facts" if we had chosen lines instead of points. It comes from matplotlib (like nearly all plotting libraries) interpolates linearly between data points. But in our case, a date with no data points means zero commits happened on that date.
To communicate this to matplotlib, we must explicitly insert zero values for missing dates. This can be achieved by replacing
my @dates = %dates.keys.sort;
with the line
my @dates = %dates.keys.minmax;
The minmax method
finds the minimal and maximal values, and returns them in a
Range. Assigning the range to an
array turns it into an array of all values between the minimal and the
maximal value. The logic for assembling the @stack variable already
maps missing values to zero.
The result looks a bit better, but still far from perfect:
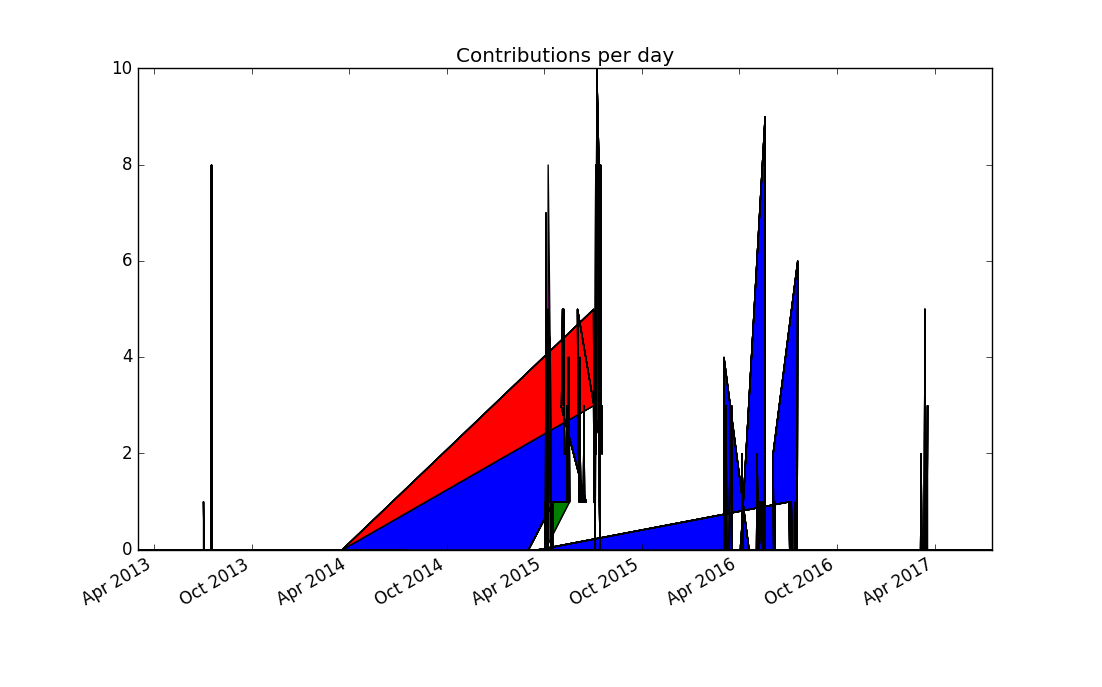
Thinking more about the problem, contributions from separate days should not be joined together, because it produces misleading results. Matplotlib doesn't support adding a legend automatically to stacked plots, so this seems to be to be a dead end.
Since a dot plot didn't work very well, let's try a different kind of
plot that represents each data point separately: a bar chart, or more
specifically, a stacked bar chart. Matplotlib offers the bar plotting
method, and a named parameter bottom can be used to generate the
stacking:
my @dates = %dates.keys.sort;
my @stack = $[] xx @top-authors;
my @bottom = $[] xx @top-authors;

for @dates -> $d {
    my $bottom = 0;
    for @top-authors.kv -> $idx, $author {
        @bottom[$idx].push: $bottom;
        my $value = %by-author{$author}{$d} // 0;
        @stack[$idx].push: $value;
        $bottom += $value;
    }
}
We need to supply color names ourselves, and set the edge color of the bars to the same color, otherwise the black edge color dominates the result:
my $width = 1.0;
my @colors = <red green blue yellow black>;
my @plots;

for @top-authors.kv -> $idx, $author {
    @plots.push: plot(
        'bar',
        $[@dates.map(&pydate)],
        @stack[$idx],
        $width,
        bottom => @bottom[$idx],
        color => @colors[$idx],
        edgecolor => @colors[$idx],
    );
}
plot('legend', $@plots, $@top-authors);

plot('title', 'Contributions per day');
plot('show');
This produces the first plot that's actually informative and not misleading (provided you're not color blind):
If you want to improve the result further, you could experiment with
limiting the number of bars by lumping together contributions by week or
month (or maybe $n-day period).
Next, we'll investigate ways to make the matplotlib API more idiomatic to use from Perl 6 code.
Sun, 19 Mar 2017
Perl 6 By Example: Plotting using Matplotlib and Inline::Python
Permanent link
This blog post is part of my ongoing project to write a book about Perl 6.
If you're interested, either in this book project or any other Perl 6 book news, please sign up for the mailing list at the bottom of the article, or here. It will be low volume (less than an email per month, on average).
Occasionally I come across git repositories, and want to know how active they are, and who the main developers are.
Let's develop a script that plots the commit history, and explore how to use Python modules in Perl 6.
Extracting the Stats
We want to plot the number of commits by author and date.
Git makes it easy for us to get to this information by giving some options
to git log:
my $proc = run :out, <git log --date=short --pretty=format:%ad!%an>;
my (%total, %by-author, %dates);
for $proc.out.lines -> $line {
    my ( $date, $author ) = $line.split: '!', 2;
    %total{$author}++;
    %by-author{$author}{$date}++;
    %dates{$date}++;
}
run executes an external command, and :out tells it to capture the
command's output, and makes it available as $proc.out. The command is
a list, with the first element being the actual executable, and the rest of
the elements are command line arguments to this executable.
Here git log gets the options --date short --pretty=format:%ad!%an, which
instructs it to print produce lines like 2017-03-01!John Doe. This line
can be parsed with a simple call to $line.split: '!', 2, which splits
on the !, and limits the result to two elements. Assigning it to a
two-element list ( $date, $author ) unpacks it. We then use hashes to
count commits by author (in %total), by author and date (%by-author)
and finally by date. In the second case, %by-author{$author} isn't
even a hash yet, and we can still hash-index it. This is due to a feature
called autovivification, which automatically creates ("vivifies") objects
where we need them. The use of ++ creates integers, {...} indexing creates
hashes, [...] indexing and .push creates arrays, and so on.
To get from these hashes to the top contributors by commit count, we can
sort %total by value. Since this sorts in ascending order, sorting
by the negative value gives the list in descending order. The list contains
Pair objects, and we only want the
first five of these, and only their keys:
my @top-authors = %total.sort(-*.value).head(5).map(*.key);
For each author, we can extract the dates of their activity and their commit counts like this:
my @dates  = %by-author{$author}.keys.sort;
my @counts = %by-author{$author}{@dates};
The last line uses slicing, that is, indexing an array with list to return a list elements.
Plotting with Python
Matplotlib is a very versatile library for all sorts of plotting and visualization. It's written in Python and for Python programs, but that won't stop us from using it in a Perl 6 program.
But first, let's take a look at a basic plotting example that uses dates
on the x axis:
import datetime
import matplotlib.pyplot as plt

fig, subplots = plt.subplots()
subplots.plot(
    [datetime.date(2017, 1, 5), datetime.date(2017, 3, 5), datetime.date(2017, 5, 5)],
    [ 42, 23, 42 ],
    label='An example',
)
subplots.legend(loc='upper center', shadow=True)
fig.autofmt_xdate()
plt.show()
To make this run, you have to install python 2.7 and matplotlib. You can do
this on Debian-based Linux systems with apt-get install -y python-matplotlib.
The package name is the same on RPM-based distributions such as CentOS or SUSE
Linux. MacOS users are advised to install a python 2.7 through homebrew and
macports, and then use pip2 install matplotlib or pip2.7 install
matplotlib to get the library. Windows installation is probably easiest
through the conda package manager, which offers
pre-built binaries of both python and matplotlib.
When you run this scripts with python2.7 dates.py, it opens a GUI window, showing
the plot and some controls, which allow you to zoom, scroll, and write the
plot graphic to a file:
Bridging the Gap
The Rakudo Perl 6 compiler comes with a handy library for calling foreign functions, which allows you to call functions written in C, or anything with a compatible binary interface.
The Inline::Python library uses the native call functionality to talk to python's C API, and offers interoperability between Perl 6 and Python code. At the time of writing, this interoperability is still fragile in places, but can be worth using for some of the great libraries that Python has to offer.
To install Inline::Python, you must have a C compiler available, and then
run
$ zef install Inline::Python
(or the same with panda instead of zef, if that's your module installer).
Now you can start to run Python 2 code in your Perl 6 programs:
use Inline::Python;

my $py = Inline::Python.new;
$py.run: 'print("Hello, Pyerl 6")';
Besides the run method, which takes a string of Python code and execute it,
you can also use call to call Python routines by specifying the namespace,
the routine to call, and a list of arguments:
use Inline::Python;

my $py = Inline::Python.new;
$py.run('import datetime');
my $date = $py.call('datetime', 'date', 2017, 1, 31);
$py.call('__builtin__', 'print', $date);    # 2017-01-31
The arguments that you pass to call are Perl 6 objects, like three Int
objects in this example. Inline::Python automatically translates them to
the corresponding Python built-in data structure. It translate numbers,
strings, arrays and hashes. Return values are also translated in opposite
direction, though since Python 2 does not distinguish properly between
byte and Unicode strings, Python strings end up as buffers in Perl 6.
Object that Inline::Python cannot translate are handled as opaque objects
on the Perl 6 side. You can pass them back into python routines (as shown
with the print call above), or you can also call methods on them:
say $date.isoformat().decode; # 2017-01-31
Perl 6 exposes attributes through methods, so Perl 6 has no syntax for
accessing attributes from foreign objects directly. If you try to access
for example the year attribute of datetime.date through the normal method call syntax, you get an error.
say $date.year;
Dies with
'int' object is not callable
Instead, you have to use the getattr builtin:
say $py.call('__builtin__', 'getattr', $date, 'year');
Using the Bridge to Plot
We need access to two namespaces in python, datetime and matplotlib.pyplot,
so let's start by importing them, and write some short helpers:
my $py = Inline::Python.new;
$py.run('import datetime');
$py.run('import matplotlib.pyplot');
sub plot(Str $name, |c) {
    $py.call('matplotlib.pyplot', $name, |c);
}

sub pydate(Str $d) {
    $py.call('datetime', 'date', $d.split('-').map(*.Int));
}
We can now call pydate('2017-03-01') to create a python datetime.date
object from an ISO-formatted string, and call the plot function to access
functionality from matplotlib:
my ($figure, $subplots) = plot('subplots');
$figure.autofmt_xdate();

my @dates = %dates.keys.sort;
$subplots.plot:
    $[@dates.map(&pydate)],
    $[ %dates{@dates} ],
    label     => 'Total',
    marker    => '.',
    linestyle => '';
The Perl 6 call plot('subplots') corresponds to the python code
fig, subplots = plt.subplots(). Passing arrays to python function needs
a bit extra work, because Inline::Python flattens arrays. Using an extra $
sigil in front of an array puts it into an extra scalar, and thus prevents
the flattening.
Now we can actually plot the number of commits by author, add a legend, and plot the result:
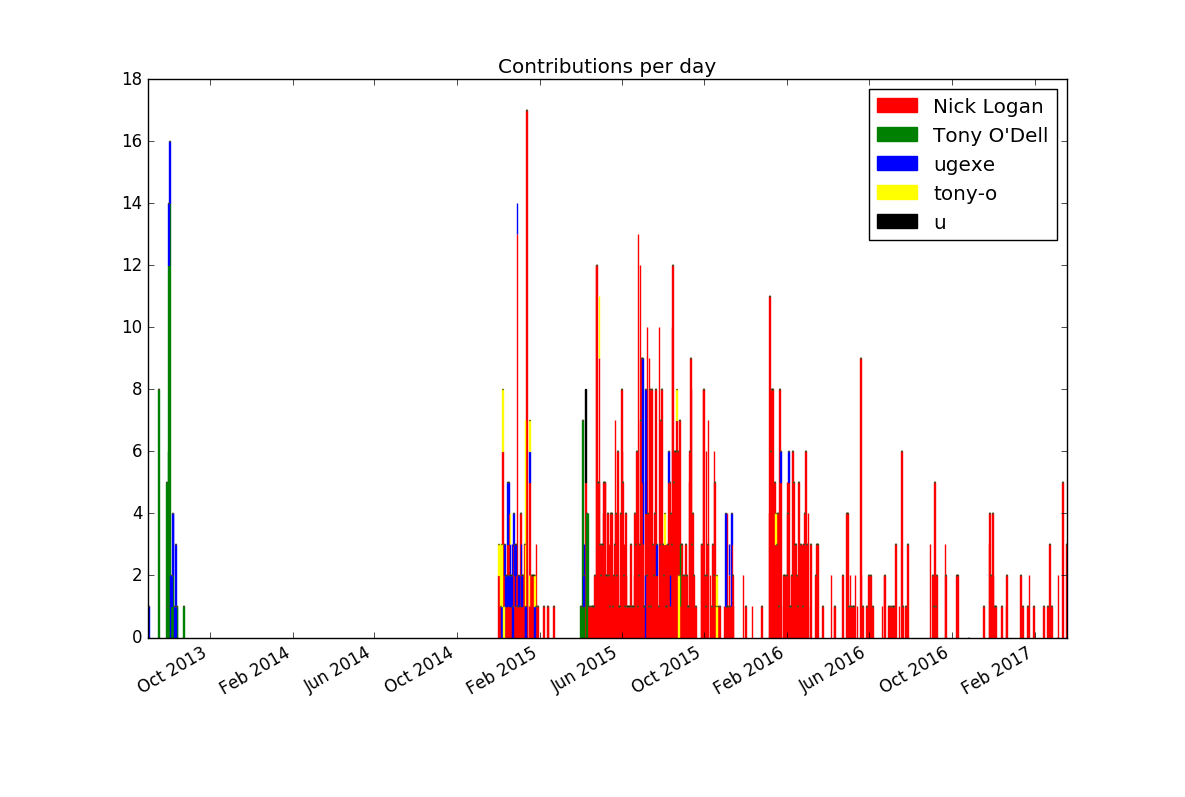
for @top-authors -> $author {
    my @dates = %by-author{$author}.keys.sort;
    my @counts = %by-author{$author}{@dates};
    $subplots.plot:
        $[ @dates.map(&pydate) ],
        $@counts,
        label     => $author,
        marker    =>'.',
        linestyle => '';
}


$subplots.legend(loc=>'upper center', shadow=>True);

plot('title', 'Contributions per day');
plot('show');
When run in the zef git repository, it produces this plot:
Summary
We've explored how to use the python library matplotlib to generate a plot
from git contribution statistics. Inline::Python provides convenient
functionality for accessing python libraries from Perl 6 code.
In the next installment, we'll explore ways to improve both the graphics and the glue code between Python and Perl 6.
Sun, 12 Mar 2017
What's a Variable, Exactly?
Permanent link
When you learn programming, you typically first learn about basic expressions,
like 2 * 21, and then the next topic is control structures or variables. (If
you start with functional programming, maybe it takes you a bit longer to get
to variables).
So, every programmer knows what a variable is, right?
Turns out, it might not be that easy.
Some people like to say that in ruby, everything is an object. Well, a variable isn't really an object. The same holds true for other languages.
But let's start from the bottom up. In a low-level programming language like C, a local variable is a name that the compiler knows, with a type attached. When the compiler generates code for the function that the variable is in, the name resolves to an address on the stack (unless the compiler optimizes the variable away entirely, or manages it through a CPU register).
So in C, the variable only exists as such while the compiler is running. When the compiler is finished, and the resulting executable runs, there might be some stack offset or memory location that corresponds to our understanding of the variable. (And there might be debugging symbols that allows some mapping back to the variable name, but that's really a special case).
In case of recursion, a local variable can exist once for each time the function is called.
Closures
In programming languages with closures, local variables can be referenced from inner functions. They can't generally live on the stack, because the reference keeps them alive. Consider this piece of Perl 6 code (though we could write the same in Javascript, Ruby, Perl 5, Python or most other dynamic languages):
sub outer() {
    my $x = 42;
    return sub inner() {
        say $x;
    }
}

my &callback = outer();
callback();
The outer function has a local (lexical) variable $x, and the inner
function uses it. So once outer has finished running, there's still an
indirect reference to the value stored in this variable.
They say you can solve any problem in computer science through another layer
of indirection, and that's true for the implementation of closures. The
&callback variable, which points to a closure, actually stores two pointers
under the hood. One goes to the static byte code representation of the code,
and the second goes to a run-time data structure called a lexical pad, or
short lexpad. Each time you invoke the outer function, a new instance of the
lexpad is created, and the closure points to the new instance, and the always
the same static code.
But even in dynamic languages with closures, variables themselves don't need to be objects. If a language forbids the creation of variables at run time, the compiler knows what variables exist in each scope, and can for example map each of them to an array index, so the lexpad becomes a compact array, and an access to a variable becomes an indexing operation into that array. Lexpads generally live on the heap, and are garbage collected (or reference counted) just like other objects.
Lexpads are mostly performance optimizations. You could have separate runtime representations of each variable, but then you'd have to have an allocation for each variable in each function call you perform, whereas which are generally much slower than a single allocation of the lexpad.
The Plot Thickens
To summarize, a variable has a name, a scope, and in languages that support it, a type. Those are properties known to the compiler, but not necessarily present at run time. At run time, a variable typically resolves to a stack offset in low-level languages, or to an index into a lexpad in dynamic languages.
Even in languages that boldly claim that "everything is an object", a variable often isn't. The value inside a variable may be, but the variable itself typically not.
Perl 6 Intricacies
The things I've written above generalize pretty neatly to many programming languages. I am a Perl 6 developer, so I have some insight into how Perl 6 implements variables. If you don't resist, I'll share it with you :-).
Variables in Perl 6 typically come with one more level of indirection, we which call a container. This allows two types of write operations: assignment stores a value inside a container (which again might be referenced to by a variable), and binding, which places either a value or a container directly into variable.
Here's an example of assignment and binding in action:
my $x;
my $y;
# assignment:
$x = 42;
$y = 'a string';

say $x;     # => 42
say $y;     # => a string

# binding:
$x := $y;

# now $x and $y point to the same container, so that assigning to one
# changes the other:
$y = 21;
say $x;     # => 21
Why, I hear you cry?
There are three major reasons.
The first is that makes assignment something
that's not special. For example in python, if you assign to anything other
than a plain variable, the compiler translates it to some special method call
(obj.attr = x to setattr(obj, 'attr', x), obj[idx] = x to a
__setitem__ call etc.). In Perl 6, if you want to implement something you
can assign to, you simply return a container from that expression, and then
assignment works naturally.
For example an array is basically just a list in which the elements are
containers. This makes @array[$index] = $value work without any special
cases, and allows you to assign to the return value of methods, functions, or
anything else you can think of, as long as the expression returns a container.
The second reason for having both binding and assignment is that it makes it pretty easy to make things read-only. If you bind a non-container into a variable, you can't assign to it anymore:
my $a := 42;
$a = "hordor";  # => Cannot assign to an immutable value
Perl 6 uses this mechanism to make function parameters read-only by default.
Likewise, returning from a function or method by default strips the container,
which avoids accidental action-at-a-distance (though an is rw annotation can
prevent that, if you really want it).
This automatic stripping of containers also makes expressions like $a + 2 work,
independently of whether $a holds an integer directly, or a container that
holds an integer. (In the implementation of Perl 6's core types, sometimes
this has to be done manually. If you ever wondered what nqp::decont does in
Rakudo's source code, that's what).
The third reason relates to types.
Perl 6 supports gradual typing, which means you can optionally annotate your variables (and other things) with types, and Perl 6 enforces them for you. It detects type errors at compile time where possible, and falls back to run-time checking types.
The type of a variable only applies to binding, but it inherits this type to its default container. And the container type is enforced at run time. You can observe this difference by binding a container with a different constraint:
my Any $x;
my Int $i;
$x := $i;
$x = "foo";     # => Type check failed in assignment to $i; expected Int but got Str ("foo")
Int is a subtype of Any, which is why the binding of $i to $x
succeeds. Now $x and $i share a container that is type-constrained to
Int, so assigning a string to it fails.
Did you notice how the error message mentions $i as the variable name, even though
we've tried to assign to $x? The variable name in the error message is really
a heuristic, which works often enough, but sometimes fails. The container
that's shared between $x and $i has no idea which variable you used to
access it, it just knows the name of the variable that created it, here $i.
Binding checks the variable type, not the container type, so this code doesn't complain:
my Any $x;
my Int $i;
$x := $i;
$x := "a string";
This distinction between variable type and container type might seem weird for scalar variables, but it really starts to make sense for arrays, hashes and other compound data structures that might want to enforce a type constraint on its elements:
sub f($x) {
    $x[0] = 7;
}
my Str @s;
f(@s);
This code declares an array whose element all must be of type Str (or
subtypes thereof). When you pass it to a function, that function has no
compile-time knowledge of the type. But since $x[0] returns a container with
type constraint Str, assigning an integer to it can produce the error you
expect from it.
Summary
Variables typically only exists as objects at compile time. At run time, they are just some memory location, either on the stack or in a lexical pad.
Perl 6 makes the understanding of the exact nature of variables a bit more involved by introducing a layer of containers between variables and values. This offers great flexibility when writing libraries that behaves like built-in classes, but comes with the burden of additional complexity.
Sun, 05 Mar 2017
Perl 6 By Example: A Unicode Search Tool
Permanent link
This blog post is part of my ongoing project to write a book about Perl 6.
If you're interested, either in this book project or any other Perl 6 book news, please sign up for the mailing list at the bottom of the article, or here. It will be low volume (less than an email per month, on average).
Every so often I have to identify or research some Unicode characters. There's a tool called uni in the Perl 5 distribution App::Uni.
Let's reimplement its basic functionality in a few lines of Perl 6 code and use that as an occasion to talk about Unicode support in Perl 6.
If you give it one character on the command line, it prints out a description of the character:
$ uni 🕐
🕐 - U+1f550 - CLOCK FACE ONE OCLOCK
If you give it a longer string instead, it searches in the list of Unicode character names and prints out the same information for each character whose description matches the search string:
$ uni third|head -n5
⅓ - U+02153 - VULGAR FRACTION ONE THIRD
⅔ - U+02154 - VULGAR FRACTION TWO THIRDS
↉ - U+02189 - VULGAR FRACTION ZERO THIRDS
㆛ - U+0319b - IDEOGRAPHIC ANNOTATION THIRD MARK
𐄺 - U+1013a - AEGEAN WEIGHT THIRD SUBUNIT
Each line corresponds to what Unicode calls a "code point", which is usually a
character on its own, but occasionally also something like a U+00300 -
COMBINING GRAVE ACCENT, which, combined with a a - U+00061 - LATIN SMALL
LETTER A makes the character à.
Perl 6 offers a method uniname in both the classes Str and Int that
produces the Unicode code point name for a given character, either in its
direct character form, or in the form the code point number. With that, the
first part of uni's desired functionality:
#!/usr/bin/env perl6

use v6;

sub format-codepoint(Int $codepoint) {
    sprintf "%s - U+%05x - %s\n",
        $codepoint.chr,
        $codepoint,
        $codepoint.uniname;
}

multi sub MAIN(Str $x where .chars == 1) {
    print format-codepoint($x.ord);
}
Let's look at it in action:
$ uni ø
ø - U+000f8 - LATIN SMALL LETTER O WITH STROKE
The chr method turns a code point number into the character and ord is
the reverse, in other words: from character to code point number.
The second part, searching in all Unicode character names, works by
brute-force enumerating all possible characters and searching through their
uniname:
multi sub MAIN($search is copy) {
    $search.=uc;
    for 1..0x10FFFF -> $codepoint {
        if $codepoint.uniname.contains($search) {
            print format-codepoint($codepoint);
        }
    }
}
Since all character names are in upper case, the search term is first
converted to upper case with $search.=uc, which is short for $search =
$search.uc. By default, parameters are read only, which is why its
declaration here uses is copy to prevent that.
Instead of this rather imperative style, we can also formulate it in a more functional style. We could think of it as a list of all characters, which we whittle down to those characters that interest us, to finally format them the way we want:
multi sub MAIN($search is copy) {
    $search.=uc;
    print (1..0x10FFFF).grep(*.uniname.contains($search))
                       .map(&format-codepoint)
                       .join;
}
To make it easier to identify (rather than search for) a string of more than one character, an explicit option can help disambiguate:
multi sub MAIN($x, Bool :$identify!) {
    print $x.ords.map(&format-codepoint).join;
}
Str.ords returns the list of code points that make up the string. With this
multi candidate of sub MAIN in place, we can do something like
$ uni --identify øre
ø - U+000f8 - LATIN SMALL LETTER O WITH STROKE
r - U+00072 - LATIN SMALL LETTER R
e - U+00065 - LATIN SMALL LETTER E
Code Points, Grapheme Clusters and Bytes
As alluded to above, not all code points are fully-fledged characters on their own. Or put another way, some things that we visually identify as a single character are actually made up of several code points. Unicode calls these sequences of one base character and potentially several combining characters as a grapheme cluster.
Strings in Perl 6 are based on these grapheme clusters. If you get a list of
characters in string with $str.comb, or extract a substring with
$str.substr(0, 4), match a regex against a string, determine the length, or
do any other operation on a string, the unit is always the grapheme cluster.
This best fits our intuitive understanding of what a character is and avoids
accidentally tearing apart a logical character through a substr, comb or
similar operation:
my $s = "ø\c[COMBINING TILDE]";
say $s;         # ø̃
say $s.chars;   # 1
The Uni type is akin to a string and
represents a sequence of codepoints. It is useful in edge cases, but doesn't
support the same wealth of operations as
Str. The typical way to go from Str to a
Uni value is to use one of the NFC, NFD, NFKC, or NFKD methods, which
yield a Uni value in the normalization form of the same name.
Below the Uni level you can also represent strings as bytes by choosing an
encoding. If you want to get from string to the byte level, call the
encode method:
my $bytes = 'Perl 6'.encode('UTF-8');
UTF-8 is the default encoding and also the one Perl 6 assumes when reading
source files. The result is something that does the
Blob role; you can access
individual bytes with positional indexing, such as $bytes[0]. The
decode method helps
you to convert a Blob to a Str.
Numbers
Number literals in Perl 6 aren't limited to the Arabic digits we are so used
to in the English speaking part of the world. All Unicode code points that
have the Decimal_Number (short Nd) property are allowed, so you can for
example use Bengali digits:
say ৪২; # 42
The same holds true for string to number conversions:
say "৪২".Int; # 42
For other numeric code points you can use the unival method to obtain its
numeric value:
say "\c[TIBETAN DIGIT HALF ZERO]".unival;
which produces the output -0.5 and also illustrates how to use a codepoint
by name inside a string literal.
Other Unicode Properties
The uniprop method
in type Str returns the general category by default:
say "ø".uniprop;                            # Ll
say "\c[TIBETAN DIGIT HALF ZERO]".uniprop;  # No
The return value needs some Unicode knowledge in order to make sense of it,
or one could read
Unicode's Technical Report 44 for the gory details.
Ll stands for Letter_Lowercase, No is Other_Number. This is what
Unicode calls the General Category, but you can ask the uniprop (or
uniprop-bool method if you're only interested in a boolean result) for
other properties as well:
say "a".uniprop-bool('ASCII_Hex_Digit');    # True
say "ü".uniprop-bool('Numeric_Type');       # False
say ".".uniprop("Word_Break");              # MidNumLet
Collation
Sorting strings starts to become complicated when you're not limited to ASCII
characters. Perl 6's sort method uses the cmp infix operator, which does a
pretty standard lexicographic comparison based on the codepoint number.
If you need to use a more sophisticated collation algorithm, Rakudo 2017.02 and newer offer the Unicode Collation Algorithm as an experimental feature:
my @list = <a ö ä Ä o ø>;
say @list.sort;                     # (a o Ä ä ö ø)

use experimental :collation;
say @list.collate;                  # (a ä Ä o ö ø)
$*COLLATION.set(:tertiary(False));
say @list.collate;                  # (a Ä ä o ö ø)
The default sort considers any character with diacritics to be larger than
ASCII characters, because that's how they appear in the code point list. On
the other hand, collate knows that characters with diacritics belong
directly after their base character, which is not perfect in every language,
but internally a good compromise.
For Latin-based scripts, the primary sorting criteria is alphabetic, the
secondary diacritics, and the third is case.
$*COLLATION.set(:tertiary(False)) thus makes .collate ignore case, so it
doesn't force lower case characters to come before upper case characters
anymore.
At the time of writing, language specification of collation is not yet implemented.
Summary
Perl 6 takes languages other than English very seriously, and goes to great lengths to facilitate working with them and the characters they use.
This includes basing strings on grapheme clusters rather than code points, support for non-Arabic digits in numbers, and access to large parts of Unicode database through built-in methods.
Sun, 26 Feb 2017
Perl 6 By Example: Functional Refactorings for Directory Visualization Code
Permanent link
This blog post is part of my ongoing project to write a book about Perl 6.
If you're interested, either in this book project or any other Perl 6 book news, please sign up for the mailing list at the bottom of the article, or here. It will be low volume (less than an email per month, on average).
In the last installment we've seen some code that generated tree maps and flame graphs from a tree of directory and file sizes.
There's a pattern that occurs three times in that code: dividing an area based on the size of the files and directories in the tree associated with the area.
Extracting such common code into a function is a good idea, but it's slightly hindered by the fact that there is custom code inside the loop that's part of the common code. Functional programming offers a solution: Put the custom code inside a separate function and have the common code call it.
Applying this technique to the tree graph flame graph looks like this:
sub subdivide($tree, $lower, $upper, &todo) {
    my $base = ($upper - $lower ) / $tree.total-size;
    my $var  = $lower;
    for $tree.children -> $child {
        my $incremented = $var + $base * $child.total-size;
        todo($child, $var, $incremented);
        $var = $incremented,
    }
}

sub flame-graph($tree, :$x1!, :$x2!, :$y!, :$height!) {
    return if $y >= $height;
    take 'rect' => [
        x      => $x1,
        y      => $y,
        width  => $x2 - $x1,
        height => 15,
        style  => "fill:" ~ random-color(),
        title  => [$tree.name ~ ', ' ~ format-size($tree.total-size)],
    ];
    return if $tree ~~ File;
    subdivide( $tree, $x1, $x2, -> $child, $x1, $x2 {
        flame-graph( $child, :$x1, :$x2, :y($y + 15), :$height );
    });
}

sub tree-map($tree, :$x1!, :$x2!, :$y1!, :$y2) {
    return if ($x2 - $x1) * ($y2 - $y1) < 20;
    take 'rect' => [
        x      => $x1,
        y      => $y1,
        width  => $x2 - $x1,
        height => $y2 - $y1,
        style  => "fill:" ~ random-color(),
        title  => [$tree.name],
    ];
    return if $tree ~~ File;

    if $x2 - $x1 > $y2 - $y1 {
        # split along the x-axis
        subdivide $tree, $x1, $x2, -> $child, $x1, $x2 {
            tree-map $child, :$x1, :$x2, :$y1, :$y2;
        }
    }
    else {
        # split along the y-axis
        subdivide $tree, $y1, $y2, -> $child, $y1, $y2 {
            tree-map $child, :$x1, :$x2, :$y1, :$y2;
        }
    }
}
The newly introduced subroutine subdivide takes a directory tree, a start
point and an end point, and finally a code object &todo. For each child of
the directory tree it calculates the new coordinates and then calls the
&todo function.
The usage in subroutine flame-graph looks like this:
subdivide( $tree, $x1, $x2, -> $child, $x1, $x2 {
flame-graph( $child, :$x1, :$x2, :y($y + 15), :$height );
});
The code object being passed to subdivide starts with ->,
which introduces the signature of a block. The code block recurses into
flame-graph, adding some extra arguments, and turning two positional
arguments into named arguments along the way.
This refactoring shortened the code and made it overall more pleasant to work
with. But there's still quite a bit of duplication between tree-map and
flame-graph: both have an initial termination condition, a take of a
rectangle, and then a call or two to subdivide. If we're willing to put all
the small differences into small, separate functions, we can unify it further.
If we pass all those new functions as arguments to each call, we create an
unpleasantly long argument list. Instead, we can use those functions to
generate the previous functions flame-graph and tree-map:
sub svg-tree-gen(:&terminate!, :&base-height!, :&subdivide-x!, :&other!) {
    sub inner($tree, :$x1!, :$x2!, :$y1!, :$y2!) {
        return if terminate(:$x1, :$x2, :$y1, :$y2);
        take 'rect' => [
            x      => $x1,
            y      => $y1,
            width  => $x2 - $x1,
            height => base-height(:$y1, :$y2),
            style  => "fill:" ~ random-color(),
            title  => [$tree.name ~ ', ' ~ format-size($tree.total-size)],
        ];
        return if $tree ~~ File;
        if subdivide-x(:$x1, :$y1, :$x2, :$y2) {
            # split along the x-axis
            subdivide $tree, $x1, $x2, -> $child, $x1, $x2 {
                inner($child, :$x1, :$x2, :y1(other($y1)), :$y2);
            }
        }
        else {
            # split along the y-axis
            subdivide $tree, $y1, $y2, -> $child, $y1, $y2 {
                inner($child, :x1(other($x1)), :$x2, :$y1, :$y2);
            }
        }
    }
}

my &flame-graph = svg-tree-gen
    terminate   => -> :$y1, :$y2, | { $y1 > $y2 },
    base-height => -> | { 15 },
    subdivide-x => -> | { True },
    other       => -> $y1 { $y1 + 15 },

my &tree-map = svg-tree-gen
    terminate   => -> :$x1, :$y1, :$x2, :$y2 { ($x2 - $x1) * ($y2 - $y1) < 20 },
    base-height => -> :$y1, :$y2 {  $y2 - $y1 },
    subdivide-x => -> :$x1, :$x2, :$y1, :$y2 { $x2 - $x1 > $y2 - $y1 },
    other       => -> $a { $a },
    ;
So there's a new function svg-tree-gen, which returns a function. The
behavior of the returned function depends on the four small functions that
svg-tree-gen receives as arguments.
The first argument, terminate, determines
under what condition the inner function should terminate early. For tree-map
that's when the area is below 20 pixels, for flame-graph when the current
y-coordinate $y1 exceeds the height of the whole image, which is stored in
$y2. svg-tree-gen always calls this function with the four named arguments
x1, x2, y1 and y2, so the terminate function must ignore the x1
and x2 values. It does this by adding | as a parameter, which is an
anonymous capture. Such a parameter can bind arbitrary positional and named
arguments, and since it's an anonymous parameter, it discards all the values.
The second configuration function, base-height, determines the height of the
rectangle in the base case. For flame-graph it's a constant, so the
configuration function must discard all arguments, again with a |. For
tree-graph, it must return the difference between $y2 and $y1, as before
the refactoring.
The third function determines when to subdivide along the x-axis. Flame graphs
always divide along the x-axis, so -> | { True } accomplishes that. Our
simplistic approach to tree graphs divides along the longer axis, so only
along the x-axis if $x2 - $x1 > $y2 - $y1.
The fourth and final function we pass to svg-tree-gen calculates the
coordinate of the axis that isn't being subdivided. In the case of
flame-graph that's increasing over the previous value by the height of the
bars, and for tree-map it's the unchanged coordinate, so we pass the
identity function -> $a { $a }.
The inner function only needs a name because we need to call it from itself
recursively; otherwise an anonymous function sub ($tree, :$x1!, :$x2!,
:$y1!, :$y2!) { ... } would have worked fine.
Now that we have very compact definitions of flame-graph and tree-map,
it's a good time to play with some of the parameters. For example we can
introduce a bit of margin in the flame graph by having the increment in
other greater than the bar height in base-height:
my &flame-graph = svg-tree-gen
    base-height => -> | { 15 },
    other       => -> $y1 { $y1 + 16 },
    # rest as before
Another knob to turn is to change the color generation to something more deterministic, and make it configurable from the outside:
sub svg-tree-gen(:&terminate!, :&base-height!, :&subdivide-x!, :&other!,
                 :&color=&random-color) {
    sub inner($tree, :$x1!, :$x2!, :$y1!, :$y2!) {
        return if terminate(:$x1, :$x2, :$y1, :$y2);
        take 'rect' => [
            x      => $x1,
            y      => $y1,
            width  => $x2 - $x1,
            height => base-height(:$y1, :$y2),
            style  => "fill:" ~ color(:$x1, :$x2, :$y1, :$y2),
            title  => [$tree.name ~ ', ' ~ format-size($tree.total-size)],
        ];
        # rest as before
}
We can, for example, keep state within the color generator and return a slightly different color during each iteration:
sub color-range(|) {
    state ($r, $g, $b) = (0, 240, 120);
    $r = ($r + 5) % 256;
    $g = ($g + 10) % 256;
    $b = ($b + 15) % 256;
    return "rgb($r,$g,$b)";
}
state variables keep their values between calls to the same subroutine and
their initialization runs only on the first call. So this function slightly
increases the lightness in each color channel for each invocation, except
when it reaches 256, where the modulo operator % resets it back to a small
value.
If we plug this into our functions by passing color => &color-range to the
calls to svg-tree-gen, we get much less chaotic looking output:

And the flame graph:

More Language Support for Functional Programming
As you've seen in the examples above, functional programming typically involves writing lots of small functions. Perl 6 has some language features that make it very easy to write such small functions.
A common task is to write a function that calls a particular method on its argument, as we've seen here:
method total-size() {
    $!total-size //= $.size + @.children.map({.total-size}).sum;
    #                                        ^^^^^^^^^^^^^
}
This can be abbreviated to *.total-size:
method total-size() {
    $!total-size //= $.size + @.children.map(*.total-size).sum;
}
This works for chains of method calls too, so you could write
@.children.map(*.total-size.round) if total-size returned a fractional
number and you wanted to the call .round method on the result.
There are more cases where you can replace an expression with the "Whatever"
star * to create a small function. To create a function that adds 15 to its
argument, you can write * + 15 instead of -> $a { $a + 15 }.
If you need to write a function to just call another function, but pass more
arguments to the second function, you can use the method
assuming. For example -> $x {
f(42, $x } can be replaced with &f.assuming(42). This works also for named
arguments, so -> $x { f($x, height => 42 ) } can be replaced with
&f.assuming(height => 42).
Summary
Functional programming offers techniques for extracting common logic into separate functions. The desired differences in behavior can be encoded in more functions that you pass in as arguments to other functions.
Perl 6 supports functional programming by making functions first class, so you can pass them around as ordinary objects. It also offers closures (access to outer lexical variables from functions), and various shortcuts that make it more pleasant to write short functions.
Sun, 19 Feb 2017
Perl 6 By Example: A File and Directory Usage Graph
Permanent link
This blog post is part of my ongoing project to write a book about Perl 6.
If you're interested, either in this book project or any other Perl 6 book news, please sign up for the mailing list at the bottom of the article, or here. It will be low volume (less than an email per month, on average).
A File and Directory Usage Graph
You bought a shiny new 2TB disk just a short while ago, and you're already getting low disk space warnings. What's taking up all that space?
To answer this question, and experiment a bit with data visualization, let's write a small tool that visualizes which files use up how much disk space.
To do that, we must first recursively read all directories and files in a given directory, and record their sizes. To get a listing of all elements in a directory, we can use the dir function, which returns a lazy list of IO::Path objects.
We distinguish between directories, which can have child entries, and files, which don't. Both can have a direct size, and in the case of directories also a total size, which includes files and subdirectories, recursively:
class File {
    has $.name;
    has $.size;
    method total-size() { $.size }
}

class Directory {
    has $.name;
    has $.size;
    has @.children;
    has $!total-size;
    method total-size() {
        $!total-size //= $.size + @.children.map({.total-size}).sum;
    }
}

sub tree(IO::Path $path) {
    if $path.d {
        return Directory.new(
            name     => $path.basename,
            size     => $path.s,
            children => dir($path).map(&tree),
        );
    }
    else {
        return File.new(
            name => $path.Str,
            size => $path.s,
        );
    }
}
Method total-size in class Directory uses the construct $var //= EXPR´.
The//stands for *defined-OR*, so it returns the left-hand side if it has a
defined value. Otherwise, it evalutes and returns the value ofEXPR`.
Combined with the assignment operator, it evaluates the right-hand side only
if the variable is undefined, and then stores the value of the expression in
the variable. That's a short way to write a cache.
The code for reading a file tree recursively uses the d and s methods on
IO::Path. d returns True for directories, and false for files. s returns
the size. (Note that .s on directories used to throw an exception in older
Rakudo versions. You must use Rakudo 2017.01-169 or newer for this to work; if
you are stuck on an older version of Rakudo, you could hard code the size of a
directory to a typical block size, like 4096 bytes. It typically won't skew
your results too much).
Just to check that we've got a sensible data structure, we can write a short routine that prints it recursively, with indention to indicate nesting of directory entries:
sub print-tree($tree, Int $indent = 0) {
    say ' ' x $indent, format-size($tree.total-size), '  ', $tree.name;
    if $tree ~~ Directory {
        print-tree($_, $indent + 2) for $tree.children
    }
}

sub format-size(Int $bytes) {
    my @units = flat '', <k M G T P>;
    my @steps = (1, { $_ * 1024 } ... *).head(6);
    for @steps.kv -> $idx, $step {
        my $in-unit = $bytes / $step;
        if $in-unit < 1024 {
            return sprintf '%.1f%s', $in-unit, @units[$idx];
        }
    }
}

sub MAIN($dir = '.') {
    print-tree(tree($dir.IO));
}
The subroutine print-tree is pretty boring, if you're used to recursion. It
prins out the name and size of the current node, and if the current node is a
directory, recurses into each children with an increased indention. The
indention is applied through the x string repetition operator, which when
called as $string x $count repeates the $string for $count times.
To get a human-readable repretation of the size of a number, format-size
knows a list of six units: the empty string for one, k (kilo) for 1024, M
(mega) for 1024*1024 and so on. This list is stored in the array @units. The
multiplies assoziated with each unit is stored in @steps, which is
iniitliazed through the series operator. .... Its structure is
INITIAL, CALLABLE ... LIMIT, and repeatedly applies CALLABLE first to the
initial value, and then to next value generated and so on, until it hits
LIMIT. The limit here is *, a special term called Whatever, which in
this means it's unlimited. So the sequence operator returns a lazy,
potentially infinite list, and the tailing .head(6) call limits it to 6
values.
To find the most appropriate unit to print the size in, we have to iterate
over both the values and in the indexes of the array, which for @steps.kv ->
$idx, $step { .. } accomplishes. sprintf, known from other programming
languages, does the actual formatting to one digit after the dot, and appends
the unit.
Generating a Tree Map
One possible visualization of file and directory sizes is a tree map, which represents each directory as a rectangle, and a each file inside it as a rectangle inside directory's rectangle. The size of each rectangle is proportional to the size of the file or directory it represents.
We'll generate an SVG file containing all those rectangles. Modern browsers support displaying those files, and also show mouse-over texts for each rectangle. This alleviates the burden to actually label the rectangnles, which can be quite a hassle.
To generate the SVG, we'll use the SVG module, which you can install with
$ zef install SVG
or
$ panda install SVG
depending on the module installer you have available.
This module provides a single static method, to which you pass nested pairs. Pairs whose values are arrays are turned into XML tags, and other pairs are turned into attributes. For example this Perl 6 script
use SVG;
print SVG.serialize(
    :svg[
        width => 100,
        height => 20,
        title => [
            'example',
        ]
    ],
);
produces this output:
<svg xmlns="http://www.w3.org/2000/svg"
     xmlns:svg="http://www.w3.org/2000/svg"
     xmlns:xlink="http://www.w3.org/1999/xlink"
     width="100"
     height="20">
        <title>example</title>
</svg>
(without the indention). The xmlns-tags are helpfully added by the SVG
module, and are necessary for programs to recognize the file as SVG.
To return to the tree maps, a very simple way to lay out the rectangle is to recurse into areas, and for each area subdivide it either horizontally or vertically, depending on which axis is longer:
sub tree-map($tree, :$x1!, :$x2!, :$y1!, :$y2) {
    # do not produce rectangles for small files/dirs
    return if ($x2 - $x1) * ($y2 - $y1) < 20;

    # produce a rectangle for the current file or dir
    take 'rect' => [
        x      => $x1,
        y      => $y1,
        width  => $x2 - $x1,
        height => $y2 - $y1,
        style  => "fill:" ~ random-color(),
        title  => [$tree.name],
    ];
    return if $tree ~~ File;

    if $x2 - $x1 > $y2 - $y1 {
        # split along the x axis
        my $base = ($x2 - $x1) / $tree.total-size;
        my $new-x = $x1;
        for $tree.children -> $child {
            my $increment = $base * $child.total-size;
            tree-map(
                $child,
                x1 => $new-x,
                x2 => $new-x + $increment,
                :$y1,
                :$y2,
            );
            $new-x += $increment;
        }
    }
    else {
        # split along the y axis
        my $base = ($y2 - $y1) / $tree.total-size;
        my $new-y = $y1;
        for $tree.children -> $child {
            my $increment = $base * $child.total-size;
            tree-map(
                $child,
                :$x1,
                :$x2,
                y1 => $new-y,
                y2 => $new-y + $increment,
            );
            $new-y += $increment;
        }
    }
}

sub random-color {
    return 'rgb(' ~ (1..3).map({ (^256).pick }).join(',') ~ ')';
}

sub MAIN($dir = '.', :$type="flame") {
    my $tree = tree($dir.IO);
    use SVG;
    my $width = 1024;
    my $height = 768;
    say SVG.serialize(
        :svg[
            :$width,
            :$height,
            | gather tree-map $tree, x1 => 0, x2 => $width, y1 => 0, y2 => $height
        ]
    );
}
Tree map of an example directory, with random colors and a mouse-over hover identifying one of the files.
The generated file is not pretty, due to the random colors, and due to some
files being identified as very narrow rectangles. But it does make it obvious
that there are a few big files, and many mostly small files in a directory
(which happens to be the .git directory of a repository). Viewing a file in
a browser shows the name of the file on mouse over.
How did we generate this file?
Sub tree-map calls take to adds elements to a result list, so it must be
called in the context of a gather statement. gather { take 1; take 2 }
returns a lazy list of two elements, 1, 2. But the take calls don't have
to occur in the lexical scope of the gather, they can be in any code
that's directly or indirectly called from the gather. We call that the
dynamic scope.
The rest of sub tree-map is mostly straight-forward. For each direction in
which the remaining rectangle can be split, we calculate a base unit that
signifies how many pixels a byte should take up. This is used to split up the
current canvas into smaller ones, and use those to recurse into tree-map.
The random color generation uses ^256 to create a range from 0 to 256
(exclusive), and .pick returns a random element from this range. The result
is a random CSS color string like rgb(120,240,5).
In sub MAIN, the gather returns a list, which would normally be
nested inside the outer array. The pipe symbol | in :svg[ ..., | gather
... ] before the gather prevents the normal nesting, and flattens the list
into the outer array.
Flame Graphs
The disadvantage of tree maps as generated before is that the human brain isn't very good at comparing rectangle sizes of different aspect ratios, so if their ratio of width to height is very different. Flame graphs prevent this perception errors by showing file sizes as horizontal bars. The vertical arrangement indicates the nesting of directories and files inside other directories. The disadvantage is that less of the available space is used for visualizing the file sizes.
Generating flame graphs is easier than tree maps, because you only need to subdivide in one direction, whereas the height of each bar is fixed, here to 15 pixel:
sub flame-graph($tree, :$x1!, :$x2!, :$y!, :$height!) {
    return if $y >= $height;
    take 'rect' => [
        x      => $x1,
        y      => $y,
        width  => $x2 - $x1,
        height => 15,
        style  => "fill:" ~ random-color(),
        title  => [$tree.name ~ ', ' ~ format-size($tree.total-size)],
    ];
    return if $tree ~~ File;

    my $base = ($x2 - $x1) / $tree.total-size;
    my $new-x = $x1;

    for $tree.children -> $child {
        my $increment = $base * $child.total-size;
        flame-graph(
            $child,
            x1 => $new-x,
            x2 => $new-x + $increment,
            y => $y + 15,
            :$height,
        );
        $new-x += $increment;
    }
}
We can add a switch to sub MAIN to call either tree-map or flame-graph,
depending on a command line option:
sub MAIN($dir = '.', :$type="flame") {
    my $tree = tree($dir.IO);
    use SVG;
    my $width = 1024;
    my $height = 768;
    my &grapher = $type eq 'flame'
            ?? { flame-graph $tree, x1 => 0, x2 => $width, y => 0, :$height }
            !! { tree-map    $tree, x1 => 0, x2 => $width, y1 => 0, y2 => $height }
    say SVG.serialize(
        :svg[
            :$width,
            :$height,
            | gather grapher()
        ]
    );
}
Since SVG's coordinate system places the zero of the vertical axis at the top, this actually produces an inverted flame graph, sometimes called icicle graph:

Inverted flame graph with random colors, where the width of each bar
represents a file/directory size, and the vertical position the nesting inside
a directory.
Summary
We've explored tree maps and flame graphs to visualize which files and directories use up how much disk space.
But the code contains quite some duplications. Next week we'll explore techniques from functional programming to reduce code duplication. We'll also try to make the resulting files a bit prettier.
Sun, 12 Feb 2017
Perl 6 By Example: Generating Good Parse Errors from a Parser
Permanent link
This blog post is part of my ongoing project to write a book about Perl 6.
If you're interested, either in this book project or any other Perl 6 book news, please sign up for the mailing list at the bottom of the article, or here. It will be low volume (less than an email per month, on average).
Good error messages are paramount to the user experience of any product. Parsers are no exception to this. Consider the difference between the message "Square bracket [ on line 5 closed by curly bracket } on line 5", in contrast to Python's lazy and generic "SyntaxError: invalid syntax".
In addition to the textual message, knowing the location of the parse error helps tremendously in figuring out what's wrong.
We'll explore how to generate better parsing error messages from a Perl 6 grammar, using the INI file parse from the previous blog posts as an example.
Failure is Normal
Before we start, it's important to realize that in a grammar-based parser, it's normal for regex to fail to match. Even in an overall successful parse.
Let's recall a part of the parser:
token block { [<pair> | <comment>]* }
token section { <header> <block> }
token TOP { <block> <section>* }
When this grammar matches against the string
key=value
[header]
other=stuff
then TOP calls block, which calls both pair and comment. The pair
match succeeds, the comment match fails. No big deal. But since there is a
* quantifier in token block, it tries again to match pair or comment.
neither succeeds, but the overall match of token block still succeeds.
A nice way to visualize passed and failed submatches is to install the
Grammar::Tracer module (zef install Grammar::Tracer or panda install
Grammar::Tracer), and simple add the statement use Grammar::Tracer before
the grammar definition. This produces debug output showing which rules matched
and which didn't:
TOP
|  block
|  |  pair
|  |  |  key
|  |  |  * MATCH "key"
|  |  |  ws
|  |  |  * MATCH ""
|  |  |  ws
|  |  |  * MATCH ""
|  |  |  value
|  |  |  * MATCH "value"
|  |  |  ws
|  |  |  * MATCH ""
|  |  |  ws
|  |  |  * MATCH ""
|  |  * MATCH "key=value\n"
|  |  pair
|  |  |  key
|  |  |  * FAIL
|  |  * FAIL
|  |  comment
|  |  * FAIL
|  * MATCH "key=value\n"
|  section
...
Detecting Harmful Failure
To produce good parsing error messages, you must distinguish between expected and unexpected parse failures. As explained above, a match failure of a single regex or token is not generally an indication of a malformed input. But you can identify points where you know that once the regex engine got this far, the rest of the match must succeed.
If you recall pair:
rule pair { <key> '=' <value> \n+ }
we know that if a key was parsed, we really expect the next character to be an equals sign. If not, the input is malformed.
In code, this looks like this:
rule pair {
    <key>
    [ '=' || <expect('=')> ]
     <value> \n+
}
|| is a sequential alternative, which first tries to match the subregex on
the left-hand side, and only executes the right-hand side if that failed. On
the other hand, | executes all alternatives notionally in parallel, and
takes the long match.
So now we have to define expect:
method expect($what) {
    die "Cannot parse input as INI file: Expected $what";
}
Yes, you can call methods just like regexes, because regexes really are
methods under the hood. die throws an exception, so now the malformed input
justakey produces the error
Cannot parse input as INI file: Expected =
followed by a backtrace. That's already better than "invalid syntax", though
the position is still missing. Inside method expect, we can find the current
parsing position through method pos, a method supplied by the implicit
parent class Grammar that the grammar
declaration brings with it.
We can use that to improve the error message a bit:
method expect($what) {
    die "Cannot parse input as INI file: Expected $what at character {self.pos}";
}
Providing Context
For larger inputs, we really want to print the line number. To calculate that,
we need to get hold of the target string, which is available as method
target:
method expect($what) {
    my $parsed-so-far = self.target.substr(0, self.pos);
    my @lines = $parsed-so-far.lines;
    die "Cannot parse input as INI file: Expected $what at line @lines.elems(), after '@lines[*-1]'";
}
This brings us from the "meh" realm of error messages to quite good.
IniFile.parse(q:to/EOI/);
key=value
[section]
key_without_value
more=key
EOI
now dies with
Cannot parse input as INI file: Expected = at line 3, after 'key_without_value'
You can refine method expect more, for example by providing context both before
and after the position of the parse failure.
And of course you have to apply the [ thing || <expect('thing')> ] pattern
at more places inside the regex to get better error messages.
Finally you can provide different kinds of error messages too. For example
when parsing a section header, once the initial [ is parsed, you likely
don't want an error message "expected rest of section header", but rather
"malformed section header, at line ...":
rule pair {
    <key>
    [ '=' || <expect('=')> ]
    [ <value> || <expect('value')>]
     \n+
}
token header {
     '['
     [ ( <-[ \[ \] \n ]>+ )  ']'
         || <error("malformed section header")> ]
}
...

method expect($what) {
    self.error("expected $what");
}

method error($msg) {
    my $parsed-so-far = self.target.substr(0, self.pos);
    my @lines = $parsed-so-far.lines;
    die "Cannot parse input as INI file: $msg at line @lines.elems(), after '@lines[*-1]'";
}
Since Rakudo Perl 6 uses grammars to parse Perl 6 input, you can use Rakudo's own grammar as source of inspiration for more ways to make error reporting even better.
Summary
To generate good error messages from a parser, you need to distinguish between
expected and unexpected match failures. The sequential alternative || is a
tool you can use to turn unexpected match failures into error messages by
raising an exception from the second branch of the alternative.